Sunday 3 August 2014

Query Builder API

Query Builder API

Query Builder is an API to build queries which use JCR XPath underneath. Query Builder is exposed as
  1. Java API
  2. Rest API
 Java API QueryBuilder is available as an OSGi reference. This API can be used to build the queries using  predicate groups, example shown below.
  Map map = new HashMap();
 map.put("path", "/content");
 map.put("type", "nt:file");
 Query query = builder.createQuery(PredicateGroup.create(map), session);
 SearchResult result = query.getResult();

The REST API provides the same functionality through HTTP with response being rendered in JSON. HTTP Query request should start with the url http://localhost:4502/bin/querybuilder.json with all the search filters being provided as URL query parameters. Check out the examples below 

The search parameters provided above are path to search for and type of resource required .We have lot of parameters defined, some of them shown below
type = cq:Page         //  Type of resource
nodename = *.jar    //    Node name/pattern
orderby = @jcr:content/jcr:lastModified    // Order by property defined ( here its based on modified date)
orderby.sor t= desc  // ordering type

To search based on any property we can use 
property = jcr:content/cq:template    // Property name
property.value =apps/myapp/templates/mytemplate  //  Value of the property
To search multiple properties at a time
1.property = jcr:content/cq:template
1.property.value = apps/myapp/templates/mytemplate
2.property = jcr:content/jcr:title
2.property.value = MyTitle

To search for multi valued property - A property can have more than one value  (Array of values)
property = jcr:content/jcr:title
property.1_value = MyTitle1
property.2_value = MyTitle2
property.3_value = MyTitle3

Restricting the result (JSON Response)

By default QueryBuilder returns only default set of properties, If you want to have all the properties in your result use 
p.hits = full    

Most of the times we may be interested in only some selective properties, in that case we can specify the properties required separated by space 
p.hits = selective
p.properties = jcr:title sling:resourceType

By default we will only the first 10 hits, to get the entire search you can use
p.limit = -1
p.limit = 50 // only 50 hits will be retrieved
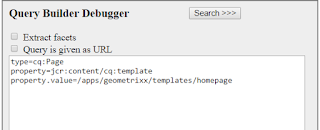
Query Debugger 

AEM provides Query Debugger which can be used to test, create and check the response time and results retrieved 

The debugger can be found at http://localhost:4502/libs/cq/search/content/querydebug.html
In the box provided you can put down all the query parameters as shown


Once you run this search query the result will be displayed as 


Result will have only 10 hits by default, its displays the time took for the search and the respective XPath query


Sunday 15 June 2014

JSON.jsp

Before writing a JSON.jsp to get custom json data ,lets see how it works.

Sling gives importance to the resource rather than the type of resource.

The above mentioned statement explains what Sling is.Sling gives us the opportunity to render the same data in different types like html,xml and json etc.

Lets go through response from the below requests.

http://localhost:4502/content/geometrixx/en.html

http://localhost:4502/content/geometrixx/en.json

http://localhost:4502/content/geometrixx/en.xml

All the above three urls requests the data at path "/content/geometrixx/en" , where en is node of type page (cq:Page) . But the response what we get differs based on the extension .

More about sling request processing can be found at
http://dev.day.com/docs/en/cq/current/developing/the_basics.html#Sling Request Processing

Now we have a page and we want to customize the json response on the page we need a "json.jsp" on that page  component.

Create a new file by name "json.jsp" for the geometrixx page at path "/apps/geometrixx/components/homepage"and write the code paste the code given below.

<%@ page import="org.apache.sling.commons.json.io.*" %>
<%@include file="/libs/foundation/global.jsp" %>
<% 
response.setContentType("application/json");
response.setCharacterEncoding("utf-8");

JSONWriter writer = new JSONWriter(response.getWriter());
writer.object();
writer.key("Name");
writer.value("English");
writer.key("Code");
writer.value("en");
writer.endObject();
%>

Now we can see our custom JSON response at
http://localhost:4502/content/geometrixx/en/jcr:content.json


Sunday 18 May 2014

CQ Defined objects


CQ and Sling has provided some custom tag libraries which could reduce the development effort. <cq:definedObjects/>, <sling:definedObjects/>  has some regularly used scripting objects.

If "/libs/foundation/global.jsp" is included in the script, these tag libraries will get included by default

Objects defined by Sling:

slingRequest – SlingHttpServletRequest  Object
  <%ResourceResolver rr=slingRequest.getResourceResolver();%>
But resource resolver is already available as a defined object explained below

slingResponse – SlingHttpServletResponse Object

request - HttpServletRequest Object

response -  HttpServletResponse Object

resourceResolver - Current requests ResourceResolver Object                  <%=resourceResolver.getResource("/apps/blog/components/checkboxtest").getName()%>

sling - SlingScriptHelper Object which provides methods for scripts.Most commonly used to fetch an OSGI
           service reference
            <% QueryBuilder queryBuilder=sling.getService(QueryBuilder.class); %>

resource - The current resource same as slingRequest.getResource();
 <%=resource.getResourceType()%>

currentNode - Current resource node Object
      <%=currentNode.getName()%>
log - SLF4J logger
<%log.info("Logging test");%>

Objects defined by CQ:

componentContext - The current component context Object
                                 <%=componentContext.getComponent()%>

component - The current component Object
                     <%=component.getComponentGroup()%>

currentPage - Current page object
                       <%=currentPage.getPath()%>

pageManager - Page manager object useful for performing operations on page
                         <%=pageManager.getPage("page path")%>

pageProperties - Page properties that can be used directly rather than reading them from page again
                           
properties - properties of the current resource
                    <%STring arr[]=properties.get("myProperty",String[].class);%>


More details on the tag libraries available at
http://wem.help.adobe.com/enterprise/en_US/10-0/wem/howto/taglib.html


Friday 16 May 2014

Checkbox component

Creating a Selection (checkbox) component in Adobe CQ

Section below describes step by step procedure for creating checkbox component in Adobe CQ

1.Right click on the folder where you want to create the component and select "Create Component"

2.Enter the details for Label ,Title and Group ,make sure you enter different text for each.
       E.g  Label :checkbox ,Title:My checkbox ,Group: MyComponents
 

      The component will get created along with the jsp associated with it.


3.We need a dialog ,which will enable us to interact with the user.
For that right click on the component and select "Create Dialog",now
your component looks like something as shown .


4.Right click on the node "tab1" (which is be created as a part of dialog)
  and create a node by name "items" and type as "cq:WidgetCollection".

5.Right click on "items" and create node by name "checkbox" and type as      "cq:Widget"

6.Add properties to checkbox node

name: "xtype"  value: "selection"
name: "type"    value: checkbox"
name: "name" value: "./checboxtest"


7. Right click on node "checkbox" and create a node    by name"options" and type"cq:WidgetCollection".

8.Right click on "options" and create node "option1" , add properties to the node "text" and "value" with       the data required,create required number of options(option2,option3...) Our component is created.

9.We can drag this component in the page.But by default our component will not be displayed in the side        kick.To make the component visible in side kick ,select the design mode from side kick .Now click on the edit button available on the "parsys" component of the page and enable the component or component group (Group: MyComponents) by selecting the checkbox.
Now we can drag the component on to the page.

You can display the selected value by adding the line "<%=properties.get("checkboxtext",String[].class)%>" to the component jsp

You can download the code package here checkboxtest-1.0